When the Promenade Glows Orange: Taming Colour Casts in British Seaside Night Shots
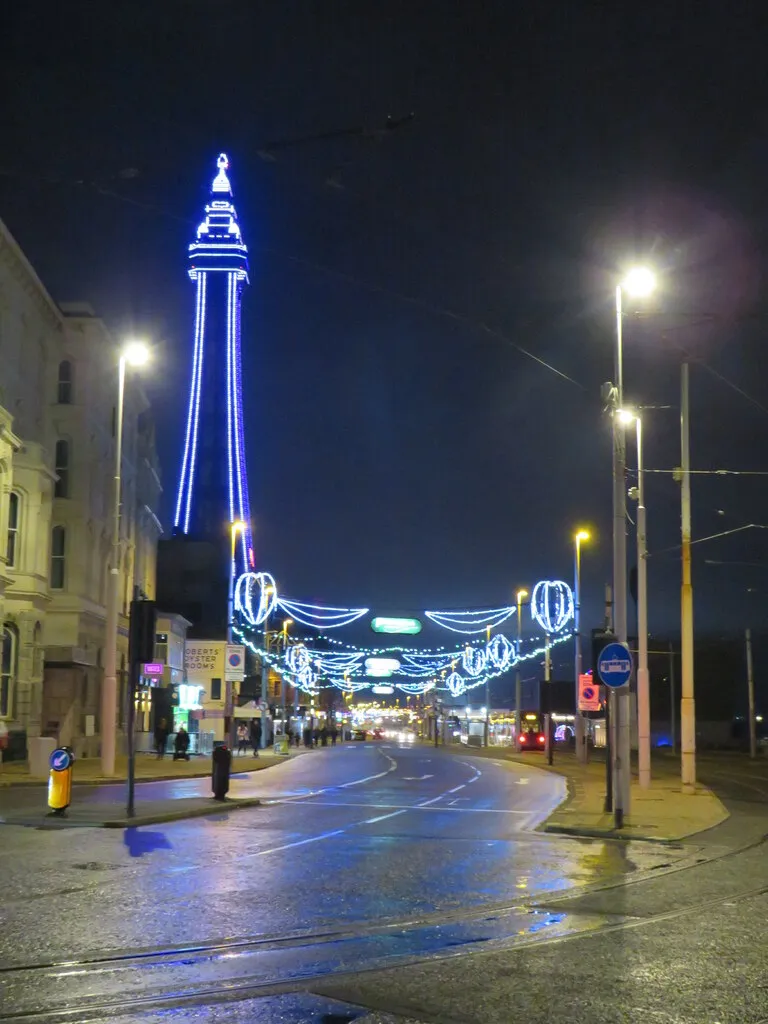
Photo: Malc McDonald , CC BY-SA 2.0, via Wikimedia Commons
The rain has stopped, the tarmac is holding a mirror, and half of Blackpool appears to be glowing orange. You fire off a few frames, get home, open one, and discover that the white railings are peach, the sky is muddy green, and everything looks like it was shot through a bag of Werther's Originals.
Welcome to seaside night photography in the UK. There is no single white balance setting that fixes it, because there isn't a single light source. There's sodium, there's modern LED, there's tungsten inside the arcades leaking out of the doors, and there's whatever is left of the blue hour behind it all. Fixing this isn't a slider job. It's a masking job.
The cast is never just one colour
Point a grey dropper at wet paving and you'll get nonsense, because wet tarmac is not neutral — it's a dark, slightly warm-brown surface reflecting whatever is above it. Point it at the white line down the middle of the road and you're closer, but you've now corrected for the streetlamp rather than for the scene.
The honest approach is to accept that your image contains three or four separate colour environments: the sky, the lit architecture, the reflected ground, and the neon itself. Each one gets its own treatment. That sounds like more work than one global white balance nudge, and it is — but it's the only way to get a result that doesn't look like a filter.
Start with a reference that should be neutral
Find something in the frame that genuinely ought to be white or grey. Painted metal railings, a white van, the concrete base of a lamp post, the rendered wall of a hotel. A Weston-super-Mare seafront bench works nicely; so does a white shop sign.
Open the file as a smart object and apply Camera Raw Filter. Take the white balance dropper, click your chosen reference, and see what happens. Nine times out of ten the result is technically correct and emotionally wrong — the whole image swings blue while the illumination, which really is orange, now looks cyan and fake.
So use the dropper as a starting point and then pull back. Slide Temperature and Tint towards the neutral point, stop when the reference reads neutral, then nudge Tint back two or three points towards magenta if the scene goes green. You're aiming for 'credible', not 'certified'.
Mask by light source, not by photo
The real work happens in layers. Create separate adjustment layers and paint their masks, using soft brushes at 20 to 40 per cent opacity so the transitions never show.
- Sky and skyline: a Curves layer with the blue channel lifted slightly, plus a small boost to the blue channel's saturation. This is your blue hour, and it's usually the best thing in the frame.
- Wet ground: a Color Balance layer pulling the shadows back from orange towards a neutral green-blue. Do it gently — the reflection should still feel like reflected light.
- Lit facades and signage: selective Hue/Saturation, reduced on the yellows and reds by five to ten points. Just enough that the eye stops being dragged to the pavement.
- The neon itself: no adjustment at all. Leave it. If you neutralise a pink sign, you've destroyed the reason for the photograph.
One useful shortcut before you start painting: Select > Color Range on the strongest cast colour gives you a workable starting mask, which you can then soften with a Gaussian Blur of a few pixels. It's rarely perfect, but it's forty per cent of the way there in ten seconds.
Leave the neon alone
This is the mistake I see most often in seaside night edits. People chase a neutral image and end up with grey signs and dull reflections, then compensate by slamming Saturation to 40. Now everything is loud and nothing is bright.
Neon is a light source, not a subject to be colour-corrected. Keep the highlights saturated and let them clip a little if they must. What you're correcting is the surfaces — the concrete, the paint, the skin of the person walking past with a bag of chips. Bring those back to believable and the neon will look more vivid by contrast, not less.
A Vibrance layer at +10 with the highlights masked out will do more than a Saturation layer at +30 ever will.
Noise, halos and the wet-tarmac trap
Night shots from a phone or an older DSLR are noisy, and wet ground amplifies it, because every one of those reflections is a tiny highlight with grain in it.
Run Denoise (or the Detail panel's noise reduction) before you do anything clever, not after — sharpening noise and then smoothing it is how you end up with waxy pavement. On the sharpening side, keep Amount modest and push Masking high; you want edges, not texture.
Then be very careful with three sliders that flatter and lie in equal measure: Clarity, Texture and Dehaze. Each of them produces halos around bright lights on dark skies, and a halo on a seaside night shot is instantly recognisable as an edit. If you must use them, restrict them with a mask to the midtones and keep the values in single figures.
Recovering shadows too aggressively is the other trap — it turns black water into grey soup. Let shadows be dark. There's supposed to be night in your night photo.
The reflections are doing you a favour
Wet paving doubles every light source, which means it gives you fill light for free. Rather than brightening a dark foreground, look for a frame where the reflection of the pier or the arcade lands where you need it.
If you're working in layers, duplicate your main colour adjustments and mask them onto the reflection area at reduced opacity. The reflected light is never quite the same colour as its source — it's darker and slightly desaturated — so reduce Saturation by around 15 per cent on that mask and you'll sell the illusion.
Grade for atmosphere, not for sunshine
At the end, resist the urge to warm the whole thing up to make it 'look nicer'. A Brighton seafront at 10pm shouldn't look like a postcard from Portugal.
Instead, cool the shadows slightly with a Color Lookup or a split-tone, leave the highlights where the lamps put them, and add a shallow vignette to pull attention towards the pier. Then check it on your phone at half brightness, because that's how most people will see it.
A five-minute checklist
- Denoise first, sharpen last.
- Smart object plus Camera Raw Filter, so you can revise next week.
- Fix the neutrals, not the atmosphere.
- One masked layer per light source.
- Neon untouched. Clarity in single figures.
- Dark shadows stay dark, wet ground stays wet.
Do that and the orange promenade stops being a problem and starts being the picture.