Fairy Lights, Cold Hands, Natural Faces: Editing Christmas Market Portraits in Photoshop
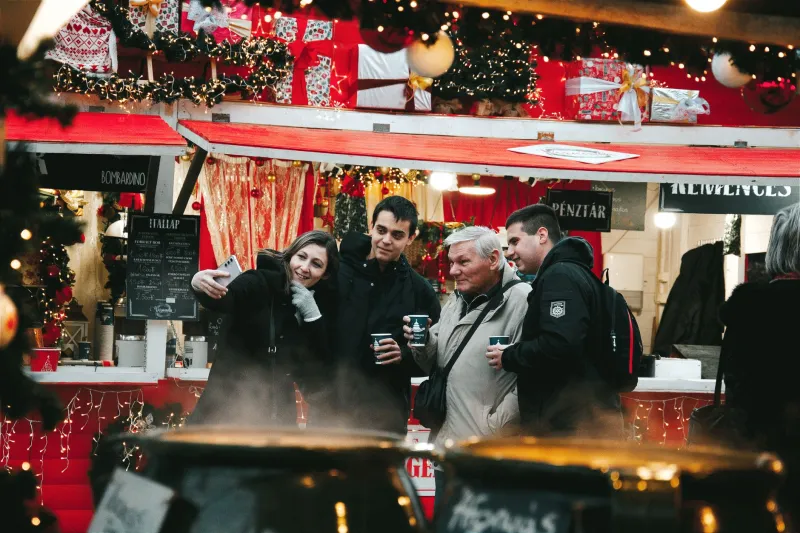
Christmas markets are a gift for photographers and a headache for editors. You get mulled wine steam, a brass band, stallholders in hats, and about six kinds of light fighting for attention. By 4pm the sky is already blue-black, the bulbs are blazing, and your phone has decided that everyone should look slightly orange. The goal in Photoshop is not to make the scene look like a studio. It is to keep faces believable while letting the fairy lights do their festive thing.
Start in Camera Raw, not Photoshop
Open the raw file - or a phone DNG if your handset supports it - in Camera Raw. If you only have a JPEG, open it as a smart object and use Filter > Camera Raw Filter, so you can revisit the settings. Before you touch contrast, sort out white balance. Do not click the eyedropper on a fairy light; it will lie to you. Look for something neutral: a grey pavement, a white paper cup, a stainless counter, a stallholder's apron. If there is nothing neutral, set temperature by eye and leave a little blue in the sky. That blue is the scene. Tint is your friend for cheap LED strips - nudge green or magenta until faces stop looking seasick.
Next, protect the highlights. Pull Highlights down, but not so far that the bulbs turn grey. A Christmas market without blown bulbs looks like a spreadsheet. Use Whites and Exposure to keep the overall brightness, then lift Shadows gently. Phone files fall apart quickly in the shadows, so leave some darkness. Noise is easier to manage than mush.
Tame the bulbs without killing the sparkle
Blown fairy lights are part of the picture. The trick is to stop them bleeding into faces and signs. In Camera Raw's Masking panel, create a Luminance Range mask for the brightest areas, then reduce Exposure and Highlights a little. Paint the mask off any faces or white text you want to keep bright. If you are working in Photoshop, Select > Color Range > Highlights, feather the selection, and use a Curves adjustment to bring the top end down. Keep the bulbs white, not grey. A tiny bit of glow is fine. A halo the size of a dinner plate is not.
For bigger bulbs, use a soft brush on a masked Curves layer and reduce only the core. Do not clone out every string of lights. The mess is the atmosphere.
Fix faces first, colour second
Skin is where mixed light gets exposed. One side of a face may be amber from a stall lamp, the other blue from twilight. Make a subject mask - Select Subject usually gets you close - and build your adjustments inside it. Start with a Curves layer to even out brightness. Then use a Hue/Saturation layer with a mask to calm any radioactive orange. In Camera Raw's Color Mixer, small moves go a long way: pull Orange saturation down a touch, lift Orange luminance slightly, and leave Red alone unless someone looks sunburnt. Avoid global saturation. It turns scarves into neon and skin into plastic.
If one side of the face is much cooler, add a second masked Color Balance layer and warm only that side. Keep it subtle. The aim is a face that looks like it was lit by the market, not by a gel kit.
Deal with phone noise and detail
Phone shots from dark markets will have colour noise in the shadows. Use Camera Raw's Denoise on a duplicate smart object, keep the amount modest, and compare at 100%. Over-denoising makes hair and wool look like fondant. After denoising, add a little sharpening with a high-pass layer, but mask it away from fairy lights and sky. Lights do not need crisp edges. People do.
If you are batch-editing a group of photos, record the basic moves as an action, then tweak faces individually. Do not batch the subject masks - they will go wrong on the one photo that matters.
Keep the scene believable
Resist the urge to make everything warm and orange. The cold sky is doing half the work. A gentle gradient on the top corners can add depth, and a very low-opacity Soft Light layer with a warm colour can lift the scene without turning it into a mulled-wine advert. Check the whites: paper cups, signage and fairy lights should still read as white or warm white, not peach. Check the blacks: coats and shadows should have detail, not crushed patches. If you have a shot with a stranger's bright phone screen in the background, either remove it or leave it. It is part of the night.
Quick export recipe
Before the season ends, save yourself a job. Keep the layered PSD as the master. For Instagram, crop to 4:5, resize to 1080 x 1350 px, convert to sRGB, and export JPEG at quality 80-85 with screen sharpening. For WhatsApp, make a 1600 px long-edge copy - nobody needs a 40 MB file of a bratwurst. For a local Facebook group, a 2048 px long-edge JPEG is plenty. Name files clearly: market-name_date_photographer.jpg. And export before you post the mulled wine on your stories, or you will be editing at midnight.
Christmas market photos are not meant to look clean. They are meant to look like the night felt. Keep the faces natural, let the lights sparkle, and stop before the whole scene turns into an orange glow. That is the rescue plan.